Hello world!
Month: July 2015
-
Disable 70-persistent-net.rules generation on CentOS 6 VM
If you’re like me you probably have an environment that is running on some virtual platform and like everyone else you have built a template to spin Linux systems. One of the things lately we were running into was the “70-persistent-net.rules”, which associated MAC address to Network interfaces.
The easiest way I have found to disable this was to do the following, it’s not pretty but works.
rm /etc/udev/rules.d/70-persistent-net.rules
echo “#” > /lib/udev/rules.d/75-persistent-net-generator.rules
Happy hacking.
-
Connecting Tableau to DataStax Cassandra with Cassandra CQL ODBC.
Recently, I did some testing with Tableau Desktop connecting to DataStax Cassandra using their newly released DataStax ODBC driver. Before the release of the DataStax ODBC driver, the only way to connect Tableau Desktop to DataStax was the DataStax Enterprise Connector (a.k.a. Hive Thrift Server).
While Hive is a great analytic tool, it is somewhat slow. When you are trying to load data for a report, which should be relatively quick, Hive can take a little time to get up to speed. I’m sure everyone that has used Hive knows what I’m talking about.
I would highly recommend downloading and installing the DataStax ODBC driver.
There is a nice little how-to on the DataStax blog @ http://www.datastax.com/download-drivers.
-
Connecting Tableau to Google Cloud SQL
Before connecting your Tableau Application up to your Google Cloud SQL Instance, you will need to make sure that you have assigned an IP Address to the instance. You will also need to allow the network in which your Tableau application is located, access to the Google Cloud SQL Instance.
First, I recommend that you use an external source to determine your IP address, such as freegeoip.net or hostip.info, this will help eliminate any network translation issues.
Now that you have your IP Address it is time to configure your Google Cloud SQL Instance. To grant access to your Tableau application, you need to do the following.
- Go to the Google Developers Console and select a project by clicking on the project name.
- In the sidebar on the left, click Storage > Cloud SQL.
- Find the instance to which you want to grant access and click the instance name. Click Edit.
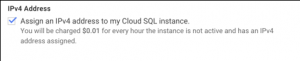
- In the IPv4 Address section, select Assign an IPv4 address to my Cloud SQL instance to assign one to the instance.
Note: There are charges when you assign an IPv4 address. For more information, see the pricing page.
 Once you have assigned the IP Address to your instance, you will need to allow the IP Address from your Tableau Application access to the instance by doing the following.
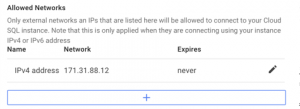
In the Allowed Networks area click on the blue border button with the plus sign. In the text box title Network add the IP Address that you obtained earlier.
Now if you haven’t already, I would recommend that you create a read-only user with access to the schema that you want access.
To configure Tableau Desktop 9.0 to Google Cloud SQL Instance, you need to configure a MySQL connection.
1.) Open Tableau Desktop.
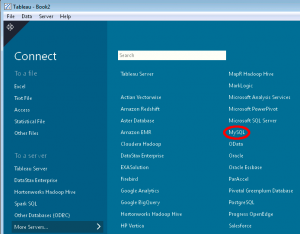
2.) On the Left-hand side under Connect click “More Servers.”
3.) Click on “MySQL.”
4.) Fill in the Server text box with the IP Address that was assigned to your Google Cloud SQL Instance, the port should be 3306, which is the default. Now simply fill in the username and password and click OK.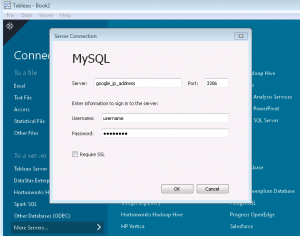
Congratulations! You’re all connected and ready to start building reports.


