Category: Databases Administration

Covering NoSQL, Relational Database, Data Visualization, and Reporting.

  • MySQL Error: 1062 'Duplicate entry' Error

    The all too common MySQL ‘Duplicate entry’ Error.

    mysql> show slave status\G;
    *************************** 1. row ***************************
                   Slave_IO_State: Waiting for master to send event
                      Master_Host: master-mysql.local
                      Master_User: repl
                      Master_Port: 3306
                    Connect_Retry: 60
                  Master_Log_File: mysql-bin.004768
              Read_Master_Log_Pos: 1022786917
                   Relay_Log_File: relay-bin.001728
                    Relay_Log_Pos: 929659721
            Relay_Master_Log_File: mysql-bin.004768
                 Slave_IO_Running: Yes
                Slave_SQL_Running: No
                  Replicate_Do_DB: 
              Replicate_Ignore_DB: information_schema,mysql
               Replicate_Do_Table: 
           Replicate_Ignore_Table:
          Replicate_Wild_Do_Table: 
      Replicate_Wild_Ignore_Table: 
                       Last_Errno: 1062
                       Last_Error: Error 'Duplicate entry 'xyz' for key 'PRIMARY'' on query. Default database: 'db'. Query: 'INSERT INTO  data  (   id,   version ) VALUES  (279598012, 5)'
                     Skip_Counter: 0
              Exec_Master_Log_Pos: 929659575
                  Relay_Log_Space: 1022787256
                  Until_Condition: None
                   Until_Log_File: 
                    Until_Log_Pos: 0
               Master_SSL_Allowed: No
               Master_SSL_CA_File: 
               Master_SSL_CA_Path: 
                  Master_SSL_Cert: 
                Master_SSL_Cipher: 
                   Master_SSL_Key: 
            Seconds_Behind_Master: NULL
    Master_SSL_Verify_Server_Cert: No
                    Last_IO_Errno: 0
                    Last_IO_Error: 
                   Last_SQL_Errno: 1062
                   Last_SQL_Error:Error 'Duplicate entry 'xyz' for key 'PRIMARY'' on query. Default database: 'db'. Query: 'INSERT INTO  data  (   id,   version ) VALUES  (279598012, 5)'
      Replicate_Ignore_Server_Ids: 
                 Master_Server_Id: 10147115
    1 row in set (0.00 sec)


    The easy way to deal with this is to verify this it is a replication entry and running the following command.

    mysql> SET GLOBAL SQL_SLAVE_SKIP_COUNTER=1; START SLAVE;

    However, if you have what seems to be a large number of duplicate entry error and don’t feel like skipping the entries one by one or you just don’t want replication to stop for this error. You can add the following to the /etc/my.cnf

    slave-skip-errors = 1062

    And restart the MySQL services. This will skip all the Duplicate entry errors until it’s removed and the MySQL is restarted.

    Keep in mind, that this error can indicate other issues with the MySQL service or system, before skipping the error completely.

  • Installing MariaDB 10.1 on CentOS 6.8

    MariaDB is a fork of the MySQL; it is notable for being led by the original developers of MySQL and is community-developed. The original developers forked it due to concerns over its acquisition by Oracle.

    MariaDB intends to be a “drop-in” replacement for MySQL, ensuring capability with library binary and matching with MySQL APIs and commands. Making it extremely easy for current MySQL User/Administrator to switch over with little to no difference in how they use it.

    It includes the XtraDB storage engine an enhanced version of the InnoDB storage engine. XtraDB is designed to better scale on modern hardware and includes a variety of other features useful in high-performance environments. To top it off XtraDB is backwards compatible with the standard InnoDB, make it a good “drop-in” replacement.

    Installational is pretty straight forward and very similar to installing MySQL. I prefer to install package with yum. So the first thing it to add the MariaDB yum repo.

    Pick your favorite editor and added the following file.
    /etc/yum.repos.d/MariaDB.repo

    # MariaDB 10.1 CentOS repository list - created 2017-03-03 18:33 UTC
    # http://downloads.mariadb.org/mariadb/repositories/
    [mariadb]
    name = MariaDB
    baseurl = http://yum.mariadb.org/10.1/centos6-amd64
    gpgkey=https://yum.mariadb.org/RPM-GPG-KEY-MariaDB
    gpgcheck=1

    Now run the following.

    [rhosto@localhost ~]$ sudo yum clean all
    
    [rhosto@localhost ~]$ sudo yum install MariaDB-server MariaDB-client

    Now we can start the service.

    [rhosto@localhost ~]$ sudo service mysql start

    Next I strongly recommend running ‘/usr/bin/mysql_secure_installation’. Which will set the MariaDB root user password and give you the option of removing the test databases and anonymous user created by default.

    [rhosto@localhost ~]$ sudo /usr/bin/mysql_secure_installation
    
    NOTE: RUNNING ALL PARTS OF THIS SCRIPT IS RECOMMENDED FOR ALL MariaDB
    SERVERS IN PRODUCTION USE! PLEASE READ EACH STEP CAREFULLY!
    
    In order to log into MariaDB to secure it, we'll need the current
    password for the root user. If you've just installed MariaDB, and
    you haven't set the root password yet, the password will be blank,
    so you should just press enter here.
    
    Enter current password for root (enter for none):
    OK, successfully used password, moving on...
    
    Setting the root password ensures that nobody can log into the MariaDB
    root user without the proper authorisation.
    
    Set root password? [Y/n] y
    New password:
    Re-enter new password:
    Password updated successfully!
    Reloading privilege tables..
    ... Success!
    
    
    By default, a MariaDB installation has an anonymous user, allowing anyone
    to log into MariaDB without having to have a user account created for
    them. This is intended only for testing, and to make the installation
    go a bit smoother. You should remove them before moving into a
    production environment.
    
    Remove anonymous users? [Y/n] Y
    ... Success!
    
    Normally, root should only be allowed to connect from 'localhost'. This
    ensures that someone cannot guess at the root password from the network.
    
    Disallow root login remotely? [Y/n] Y
    ... Success!
    
    By default, MariaDB comes with a database named 'test' that anyone can
    access. This is also intended only for testing, and should be removed
    before moving into a production environment.
    
    Remove test database and access to it? [Y/n] Y
    - Dropping test database...
    ... Success!
    - Removing privileges on test database...
    ... Success!
    
    Reloading the privilege tables will ensure that all changes made so far
    will take effect immediately.
    
    Reload privilege tables now? [Y/n] Y
    ... Success!
    
    Cleaning up...
    
    All done! If you've completed all of the above steps, your MariaDB
    installation should now be secure.
    
    Thanks for using MariaDB!

    Now verify that it will startup on reboot.

    [rhosto@localhost ~]$ sudo chkconfig --list mysql
    mysql 0:off 1:off 2:on 3:on 4:on 5:on 6:off

    And you are good to go.

    [rhosto@localhost ~]$ mysql -u root -p
    Enter password:
    Welcome to the MariaDB monitor. Commands end with ; or \g.
    Your MariaDB connection id is 11
    Server version: 10.1.21-MariaDB MariaDB Server
    
    Copyright (c) 2000, 2016, Oracle, MariaDB Corporation Ab and others.
    
    Type 'help;' or '\h' for help. Type '\c' to clear the current input statement.
    
    MariaDB [(none)]>
  • Querying Apache Hadoop Resource Manager with Python.

    Querying Apache Hadoop Resource Manager with Python.

    I was recently asked to write a script that would monitor the running application on the Apache Hadoop Resource Manager.

    I wonder over to the Apache Hadoop Cluster Application Statistics API. The API allows to query most of the information that you see in the WEB UI. Information such as status on the cluster, metrics on the cluster, scheduler information, information about nodes in the cluster, and information about applications on the cluster.

    I first start by querying the cluster info.

    import urllib2
    import json
    
    resource_manager = 'http://resourcemanager:8088'
    
    info_url = resource_manager+"/ws/v1/cluster/info"
    
    request = urllib2.Request(info_url)
    
    '''
    If you prefer to work with xml replace json below with xml
    '''
    request.add_header('Accept', 'application/json')
    
    response = urllib2.urlopen(request)
    data = json.loads(response.read())
    
    print json.dumps(data, sort_keys=True, indent=4, separators=(',', ': '))


    returns the following:

    {
    "clusterInfo": {
    "haState": "ACTIVE",
    "hadoopBuildVersion": "2.6.0-cdh5.7.0 from c00978c67b0d3fe9f3b896b5030741bd40bf541a by jenkins source checksum b2eabfa328e763c88cb14168f9b372",
    "hadoopVersion": "2.6.0-cdh5.7.0",
    "hadoopVersionBuiltOn": "2016-03-23T18:36Z",
    "id": 1478120586043,
    "resourceManagerBuildVersion": "2.6.0-cdh5.7.0 from c00978c67b0d3fe9f3b896b5030741bd40bf541a by jenkins source checksum deb0fdfede32bbbb9cfbda6aa7e380",
    "resourceManagerVersion": "2.6.0-cdh5.7.0",
    "resourceManagerVersionBuiltOn": "2016-03-23T18:43Z",
    "rmStateStoreName": "org.apache.hadoop.yarn.server.resourcemanager.recovery.NullRMStateStore",
    "startedOn": 1478120586043,
    "state": "STARTED"
    }
    }
    

    Now onto what I need to do, querying the Resource Manager about running applications. The Cluster Applications API allow you to collect information on resources, which represents an application. There are multiple parameters that can be specified to retrieve data. For a list of parameters go to Cluster_Applications_API

    I however just need the information on running applications. Which looks something like.

    import urllib2
    import json
    
    resource_manager = 'http://dvcdhnn02:8088'
    
    info_url = resource_manager+"/ws/v1/cluster/apps?states=running"
    
    request = urllib2.Request(info_url)
    
    '''
    If you prefer to work with xml replace json below with xml
    '''
    request.add_header('Accept', 'application/json')
    
    response = urllib2.urlopen(request)
    data = json.loads(response.read())
    
    print json.dumps(data, sort_keys=True, indent=4, separators=(',', ': '))
    

    which returns something like:

    {
    "apps": {
    "app": [
    {
    "allocatedMB": 24576,
    "allocatedVCores": 3,
    "amContainerLogs": "http://resourcemanager:8042/node/containerlogs/container_1478120586043_15232_01_000001/hdfs",
    "amHostHttpAddress": "resourcemanager:8042",
    "applicationTags": "",
    "applicationType": "MAPREDUCE",
    "clusterId": 1478120586043,
    "diagnostics": "",
    "elapsedTime": 18009,
    "finalStatus": "UNDEFINED",
    "finishedTime": 0,
    "id": "application_1478120586043_15232",
    "logAggregationStatus": "NOT_START",
    "memorySeconds": 431865,
    "name": "SELECT 1 AS `number_of_records...TIMESTAMP))(Stage-1)",
    "numAMContainerPreempted": 0,
    "numNonAMContainerPreempted": 0,
    "preemptedResourceMB": 0,
    "preemptedResourceVCores": 0,
    "progress": 54.07485,
    "queue": "root.hdfs",
    "runningContainers": 3,
    "startedTime": 1479156085020,
    "state": "RUNNING",
    "trackingUI": "ApplicationMaster",
    "trackingUrl": "http://resourcemanager:8088/proxy/application_1478120586043_15232/",
    "user": "hdfs",
    "vcoreSeconds": 51
    }
    ]
    }
    }
    

    straight forward and simple to use.

  • Resizing InnoDB Logs

    If you have already created your database and you change the setting for “innodb_log_file_size=###M” and restart here you database and get an error that looks something like

    InnoDB: Error: log file ./ib_logfile0 is of different size 0 5242880 bytes

    Here what you need to do.
    1.) Make sure your database shutdown clean.
    2.) Move(not delete) any existing ib_logfile[#] to a safe place.
    3.) edit the “innodb_log_file_size=###M” setting in your my.cnf.
    4.) Restart your database and check your log file to make sure there were no errors.
    5.) Check to make sure the new ib_logfile[#] are the right size.

  • MongoDB Script for counting records in collections in all the databases

    Here is a quick script. I wrote for a co-worker.

    var host = "localhost"
    var port = 27000
    var dbslist = db.adminCommand('listDatabases');
    
    for( var d = 0; d < dbslist.databases.length; d++) {
         var db = connect(host+":"+port+"/"+dbslist.databases[d].name);
         var collections = db.getCollectionNames();
         for(var i = 0; i < collections.length; i++){
             var name = collections[i];
             if(name.substr(0, 6) != 'system') {
                print("\t"+dbslist.databases[d].name+"."+name + ' = ' + db[name].count() + ' records');
             }
         }
    }


  • Apache Oozie – Shell Script Example.

    Recently I needed the ability to allow a user to submit jobs that required them to pass arguments to a shell script. While it’s easy enough to submit a job using a Web UI like HUE. I wanted to tie it to a homegrown SaaS solution that we were developing to allow developers to load datasets into a database for testing.

    Since I was already using Hadoop and Sqoop to store and load the datasets, and I didn’t want to reinvent the wheel, I decided to use Oozie that I had already installed to handle some of the Hadoop ETL jobs.

    I started off by creating a working directory on HDFS.

    hdfs dfs mkdir -p /user/me/oozie-scripts/OozieTest

    Next I created a simple shell script that take two parameters. For testing, I decided to use curl to retrieve a CSV from google.com and then copy it to HDFS. Keep mind that any application that you use in your shell script needs to be install on your data nodes.

    #!/bin/bash
    /usr/bin/curl -i “$1″  -o $2
    /usr/bin/hdfs dfs -copyFromLocal $2 $2

    Now I copied the script to the working directory on HDFS.

    shell> hdfs dfs copyFromLocal GetCSVData.sh /usr/me/oozie-scripts/OozieTest

    Next I created a simple workflow.xml template to handle the Oozie job. Oozie requires it to be name workflow.xml. This defines the actions and parameters for the actions.

    <workflow-app name=”GetCSVData” xmlns=”uri:oozie:workflow:0.4″>
    <start to=”GetCSVData”/>
    <action name=”GetCSVData”>
    <shell xmlns=”uri:oozie:shell-action:0.1″>
    <job-tracker>${jobTracker}</job-tracker>
    <name-node>${nameNode}</name-node>
    <exec>GetCSVData.sh</exec>
    <argument>${url}</argument>
    <argument>${output}</argument>
    <file>/user/root/oozie-scripts/OozieTest/GetCSVData.sh#GetCSVData.sh</file>
    </shell>
    <ok to=”end”/>
    <error to=”kill”/>
    </action>
    <kill name=”kill”>
    <message>Action failed, error message[${wf:errorMessage(wf:lastErrorNode())}]</message>
    </kill>
    <end name=”end”/>
    </workflow-app>

    The important part of this is <shell xmlns=”uri:oozie:shell-action:0.1″>. Which defines the type of action and the requirements for it.

    The sets which job tracker to run the job <job-tracker>${jobTracker}</job-tracker>

    The name-node where everything is stored <name-node>${nameNode}</name-node>

    The name of the Shell script to be executed <exec>GetCSVData.sh</exec>

    The first argument to pass to the shell script <argument>${url}</argument>

    The second argument to pass to the shell script <argument>${output}</argument>

    The location of the shell script on HDFS <file>/user/me/oozie-scripts/OozieTest/GetCSVData.sh#GetCSVData.sh</file>

    Now will we need to create a properties file named “oozietest.properties” for submitting the Oozie job. This will basically fill in the all the variables for the workflow.xml.

    oozie.wf.application.path=hdfs://localhost:8020/user/me/oozie-scripts/OozieTest
    jobTracker=localhost:8032
    nameNode=hdfs://localhost:8020
    url=http://www.google.com/finance/historical?q=NYSE%3ADATA&ei=TH0mVsrWBce7iwLE86_ABw&output=csv
    output=/tmp/DATA.csv

    The oozie.wf.application.path is the working directory on HDFS that has the workflow.xml. Where as the rest are key value pairs to fill in the value.

    Now all we need to do is submit job.

    shell> oozie job -oozie http://localhost:11000/oozie -config oozietest.properties -run

    The should generate a job id which we can use to check the status of the job we submitted.

    shell> oozie job -oozie http://dbz-datarepo-app02:11000/oozie -info [JOB_ID]

    for more information check out Apache Oozie.

  • Connecting Tableau to DataStax Cassandra with Cassandra CQL ODBC.

    Recently, I did some testing with Tableau Desktop connecting to DataStax Cassandra using their newly released DataStax ODBC driver. Before the release of the DataStax ODBC driver, the only way to connect Tableau Desktop to DataStax was the DataStax Enterprise Connector (a.k.a. Hive Thrift Server).

    While Hive is a great analytic tool, it is somewhat slow. When you are trying to load data for a report, which should be relatively quick, Hive can take a little time to get up to speed. I’m sure everyone that has used Hive knows what I’m talking about.

    I would highly recommend downloading and installing the DataStax ODBC driver.

    There is a nice little how-to on the DataStax blog @ http://www.datastax.com/download-drivers.

  • Connecting Tableau to Google Cloud SQL

    Before connecting your Tableau Application up to your Google Cloud SQL Instance, you will need to make sure that you have assigned an IP Address to the instance. You will also need to allow the network in which your Tableau application is located, access to the Google Cloud SQL Instance.

    First, I recommend that you use an external source to determine your IP address, such as freegeoip.net or hostip.info, this will help eliminate any network translation issues.

    Now that you have your IP Address it is time to configure your Google Cloud SQL Instance. To grant access to your Tableau application, you need to do the following.

    1. Go to the Google Developers Console and select a project by clicking on the project name.
    2. In the sidebar on the left, click Storage > Cloud SQL.
    3. Find the instance to which you want to grant access and click the instance name. Click Edit.
    4. In the IPv4 Address section, select Assign an IPv4 address to my Cloud SQL instance to assign one to the instance.

    Note: There are charges when you assign an IPv4 address. For more information, see the pricing page.

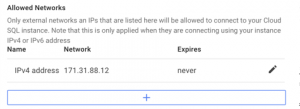
    assign-ipOnce you have assigned the IP Address to your instance, you will need to allow the IP Address from your Tableau Application access to the instance by doing the following.

    allowed-network

    In the Allowed Networks area click on the blue border button with the plus sign. In the text box title Network add the IP Address that you obtained earlier.

    Now if you haven’t already, I would recommend that you create a read-only user with access to the schema that you want access.

    To configure Tableau Desktop 9.0 to Google Cloud SQL Instance, you need to configure a MySQL connection.

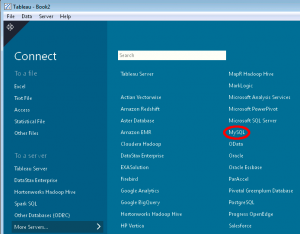
    tableau-more-servers

    1.) Open Tableau Desktop.
    2.) On the Left-hand side under Connect click “More Servers.”
    3.) Click on “MySQL.”
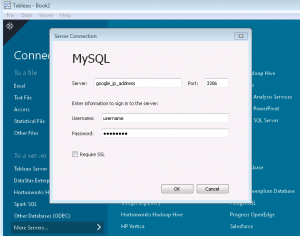
    4.) Fill in the Server text box with the IP Address that was assigned to your Google Cloud SQL Instance, the port should be 3306, which is the default. Now simply fill in the username and password and click OK.

    tableau-mysql-server-connection

    Congratulations! You’re all connected and ready to start building reports.

  • Elasticsearch

    Elasticsearch is a distributed restful search and analytic tool that is built on the top of Apache Lucene for high performance.

    Elasticsearch features include:

    Real-Time Data Indexing
    Scalability
    High Availability
    Multi-Tenancy
    Full Text Search
    Document Orientation

    The flow of data never stops so the question is how quickly can that data become available. Elasticsearch indexes the data in real-time allowing the for data to be made available as quickly as it can for real-time analytics.

    Elasticsearch is horizontally scalable. An organization can simply add nodes to expand the cluster capacity. Elasticsearch is resilient in detecting and removing failed nodes and rebalancing itself to ensure that an organization’s data is safe and accessible.

    Elasticsearch can also host multiple indices that can be queried independently or as a group. Elasticsearch structures it’s data in JSON documents. All fields are indexed by default and all the indices can be used in a single query.

    Clients can connect to Elasticsearch by using a standard HTTP REST library. This gives any programming language the ability to connect to Elasticsearch.

    Elasticsearch has been used to query 24 billion records in 900ms. It’s currently being used by companies such as Github, Foursquare, and Xing.

    website: http://www.elasticsearch.org/